Elden Ring: a confident route through your first ten hours
Start Elden Ring with a clear plan for Limgrave, weapon upgrades, Vigor, equip load, flasks, and boss practice, with two illustrated progression and combat guides.
Take these into your next session
- Build survival with Vigor, a comfortable equip load, and stronger flasks.
- Upgrade a weapon you understand before spreading levels across damage stats.
- Read the end of a boss sequence, punish briefly, and keep stamina to escape.
What this guide covers The original Elden Ring base-game opening in Limgrave and the Weeping Peninsula. No late-story spoilers, DLC route, Nightreign rules, speedrun skips, or mandatory rare drops. Suggested milestones are flexible, not required boss levels.
The most useful early lesson in Elden Ring is that a visible challenge is not an instruction to defeat it immediately. The mounted knight near the opening area, a crowded camp, and a castle boss can all be revisited. Exploring elsewhere can improve your equipment and your understanding at the same time.
This route gives your first several sessions a structure without requiring a specific build or revealing late-game story events. You will establish reliable healing, select a manageable weapon, and learn a combat loop that remains useful after Limgrave. Progress is measured by the options you create, not how quickly you force your way through the next fog gate.
1. Choose a class that makes your first fights understandable
A starting class determines initial stats and equipment; it does not permanently lock you into a role. For a first run, choose something with an obvious combat plan. A Vagabond can learn melee defense with a shield and familiar weapons, while an Astrologer can practice ranged spellcasting with a different resource balance. Neither removes the need to learn enemy movement.
Check equip load immediately. Carrying multiple equipped weapons and heavy armor can push a character into a heavy roll. Items in your inventory are not the same as items occupying equipment slots. Removing an unused equipped weapon may improve movement without sacrificing the weapon you actually use.
For a conventional medium roll, stay below 70% of maximum equip load and verify the status screen says Medium Load. Light Load is below 30%; Heavy Load begins at 70%. Exact animation and balance details can be patched, but the in-game load label is the practical check. Do not add armor blindly if it makes dodging much harder.
Complete the tutorial area if the controls are unfamiliar. Learn lock-on, two-handing, blocking, heavy attacks, the weapon skill, and quick-item selection. Set healing and frequently used items where you can reach them without cycling through a crowded list under pressure.
2. Establish your tools before chasing the castle
Explore the opening area, activate Sites of Grace, and speak to the characters you meet. Rest at early grace points, follow the introductory prompts, and obtain the ability to level up and travel with Torrent. Read conversations through rather than assuming the first line is all an NPC has to say.
Visit the Church of Elleh and the area around Gatefront at a pace you can manage. The map fragment near Gatefront helps turn an empty map into useful terrain information. Map-fragment monuments are marked on the unexplored map as small pillar icons once the surrounding area is visible enough; use them as navigation targets, not proof that the approach is safe.
Buy the crafting kit when convenient if you want to make basic consumables, and learn what the merchant sells. Avoid spending every rune on miscellaneous items just because they are available. A torch or other light source can help in dark locations, but your main priorities remain a usable combat setup and survivability.
If the Tree Sentinel overwhelms you, go around it. If the Gatefront camp attracts too many enemies, approach from the edge, separate one opponent, and retreat before the whole group joins. Your first lesson should be controlling the encounter, not proving that an underprepared character can survive everything.
3. Use a regional route with clear upgrade goals
Start with accessible Limgrave exploration: a small cave, a manageable camp, a church, or a mine. After a few short trips, consider heading south toward the Weeping Peninsula. Crossing a bridge can be dangerous, so do not interpret “beginner-friendly region” as “every enemy is harmless.”
Choose destinations by what your character needs. Churches often reward exploration with Sacred Tears that improve flask restoration. Golden Seeds increase flask uses once you collect the required amount. Mines are useful places to look for smithing materials. Small dungeons offer combat practice and varied rewards, but not every reward will suit your build.
Use map markers for unfinished encounters and inaccessible-looking routes. Record why you left: low healing, an enemy resistant to your weapon, or a drop you cannot navigate safely. Returning with a specific improvement is more satisfying than repeatedly forgetting the same obstacle.
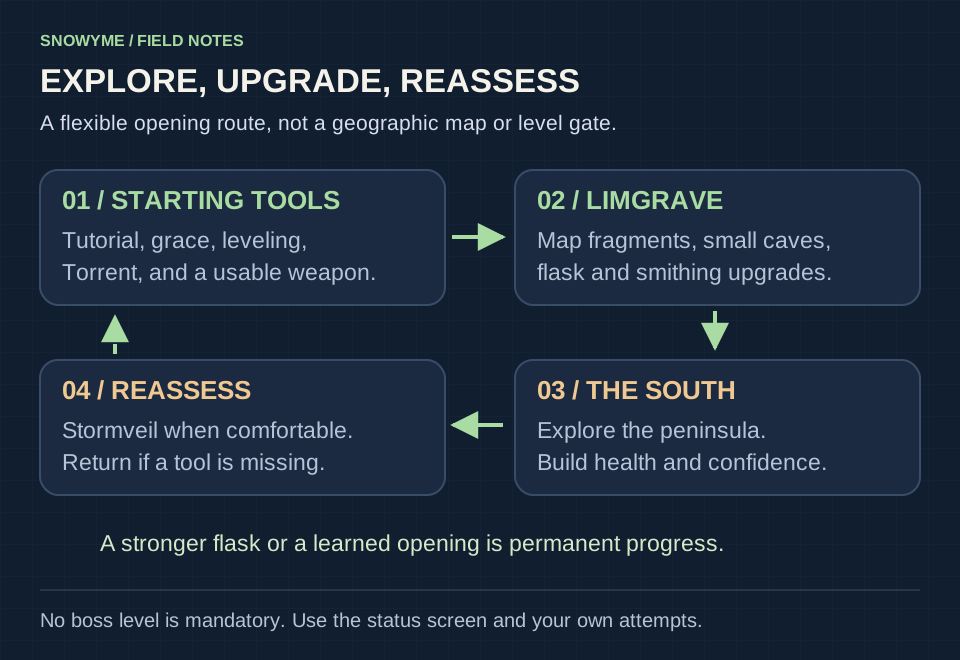
Do not build your route around collecting huge rune totals while avoiding normal play. A powerful character with unfamiliar controls still struggles when a boss closes distance. Short expeditions that teach spacing and return with an upgrade provide two kinds of progress at once.
4. Level for survival and a coherent weapon plan
Meet the requirements of the weapon or spell you intend to use, then resist spreading points across every damage stat. A beginner melee character often benefits more from additional Vigor than a small early scaling increase. Surviving an extra mistake lets you observe the next part of an enemy’s sequence.
For a straightforward early melee run, working toward roughly 20–25 Vigor while exploring Limgrave and the peninsula is a reasonable learning target, not a requirement for a named boss. Build, playstyle, and experience change what feels comfortable. Invest in Endurance when stamina or equipment needs actually justify it, and in Mind when your FP use demands it.
Weapon reinforcement is a separate and very important source of damage. Standard weapons use ordinary Smithing Stones and reach a different maximum upgrade level from special weapons that use Somber Smithing Stones. Their numbers are not directly interchangeable: a +3 special weapon is not equivalent to a +3 standard weapon.
Choose one primary weapon you enjoy and can use correctly. Upgrade it with available materials instead of lightly upgrading every new find. Early stones are not an endless supply, even though later progression opens more purchasing options. Your first choice need not be perfect; moveset comfort is a strong reason to keep using an ordinary weapon.
5. Make flasks and recovery part of the build
At a Site of Grace, check whether you can increase flask charges or the amount they restore. Allocate Crimson and Cerulean charges according to your actual HP and FP needs. A mostly physical melee character may need more healing, while a caster must preserve enough FP to finish ordinary encounters without constant retreat.
Healing creates an opening for enemies, so move to a safe distance or wait for an attack recovery before drinking. Repeatedly trying to heal while an enemy is already closing the gap can consume several charges without improving the situation. The right moment to heal is another punish window, just used defensively.
Resting restores important resources but respawns many ordinary enemies. Before resetting a difficult route, decide whether you are trying to reach a new shortcut, collect an item, or practice the fight. A shortcut can matter more than defeating every enemy again.
Spend runes before a risky experiment when you can make a useful purchase or level. Golden Rune consumables remain items until used, so keeping them unopened preserves a reserve you can spend when needed. Do not consume a large pile just before entering a fight you are using to learn.
6. Read the sequence, not just the first swing
Many bosses punish an immediate response to the start of an animation. A raised weapon may pause before striking, and the first visible hit may lead into several more. Watch the actual release and follow-up rather than rolling repeatedly because something looks threatening.
Your first attempt can have a narrow goal: survive long enough to identify two safe openings. Attack once after a clearly finished sequence, then return to defense. When one hit is dependable, test whether a second is safe. This creates knowledge rather than a series of damage races with uncertain endings.
Keep enough stamina for the defensive action after your attack. Emptying the bar with a long combo leaves no margin for a dodge or block. If you use a shield, lower it during safe gaps to recover stamina more effectively, and watch for grabs or attacks that the shield cannot solve.
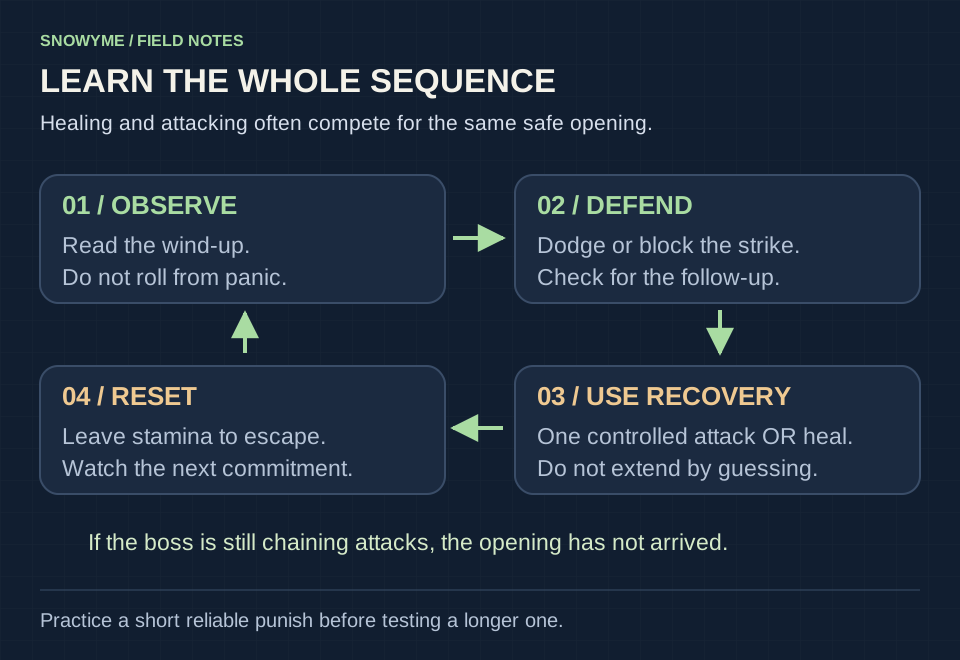
Guard counters can punish an attack after you block it, but performing one immediately into a continuing combo is risky. Jump attacks and charged heavy attacks can contribute to breaking an enemy’s stance when appropriate. These are tools for recognized windows, not reasons to attack through every animation.
7. Choose the right tool for the encounter
| What keeps going wrong | First adjustment to try | Why it helps |
|---|---|---|
| One hit removes most of your health | Check Vigor, armor tradeoffs, and flask strength | More recovery margin gives you time to learn instead of restarting immediately. |
| Dodges feel slow or unreliable | Check equip load and stop panic rolling | Medium movement and deliberate timing address different parts of the problem. |
| Damage feels low despite many levels | Check reinforcement and weapon requirements | Levels cannot compensate for an under-upgraded or improperly used weapon. |
| You get hit after a successful attack | Shorten the punish and save stamina | The opening may only support one hit before the next sequence. |
| Several enemies overwhelm you | Pull one at a time, reposition, or change the route | The encounter becomes easier before the first attack lands. |
If a weapon skill is difficult to access, check the interaction with your off-hand equipment. A shield’s skill can take priority over the right-hand weapon skill. Two-handing or a shield without a competing skill may change what the input does. Test safely at a grace point rather than discovering the behavior during a boss attempt.
Lock-on helps track many opponents, but it is not always best near a large enemy or while navigating awkward terrain. Try unlocking when the camera prevents you from seeing the attack or escape route. A small control change can resolve a problem that additional damage cannot.
8. Use summons and co-op with their actual restrictions
Spirit Ashes require the relevant summoning item and are available only in eligible areas, indicated by the on-screen monument icon. They also have resource costs and encounter restrictions. If a summon cannot be used, check the location, resources, and multiplayer state before assuming the item is broken.
A spirit can create room to observe or heal, but you still need to watch where the enemy’s attention moves. A boss may switch targets during a sequence. Attacking freely because it was facing the spirit a moment ago can put you directly into the next strike.
Player co-op has different rules and availability from Spirit Ashes. It can be enjoyable and helpful, but introduces network and multiplayer constraints and can change encounter scaling. Follow the game’s current instructions for summoning items and matching rather than expecting every tool to work simultaneously.
Neither system is a failure to play correctly. Use the tools that make the experience satisfying, and learn what they change. If you prefer solo attempts, keeping a shorter punish and a stronger survival setup follows the same logic.
9. Know when to return to exploration
After several unsuccessful attempts, identify whether the blocker is knowledge or preparation. If you can explain the attacks but run out of damage and healing, an upgrade trip is useful. If you still cannot recognize the end of a sequence, another ten levels may not address the main problem.
A reasonable readiness check for a major early boss is simple: your weapon is reinforced as far as your available materials allow, your load matches your intended movement, you have invested in survival, and you know where you can safely heal. There is no universal required level that makes all builds and players equivalent.
If you lose runes, retrieve them with a plan. Do not drag every nearby enemy into a frantic recovery attempt. Sometimes a small lost pile is worth abandoning to avoid another cycle of frustration. The permanent progress—equipment, unlocked routes, and learned timing—usually matters more than one recoverable number.
Frequently asked questions
Is the starting class a permanent build choice?
No. It establishes initial stats and gear, and some choices are more efficient for a later specialist build. For a first playthrough, a comfortable opening matters more than a perfectly optimized endpoint. Respecialization becomes available later through progression and a limited resource.
Should I defeat every enemy on the way to a boss?
Not necessarily. Learn the area, activate shortcuts, and decide whether a safe run past ordinary enemies is practical. Sprinting through an unfamiliar route can create new danger; repeating a cleared path intelligently is different from rushing blindly.
Should I upgrade a weapon before finding something rare?
Yes, a compatible ordinary weapon can carry a great deal of the game. Save enough materials to make deliberate choices, but do not remain weak indefinitely waiting for a perfect drop. Test a new moveset before committing heavily to it.
What does this guide spoil?
It names early regions, systems, and the direction toward Stormveil, but avoids later story outcomes and hidden quest resolutions. If you want maximum discovery, use the survival and combat sections while choosing your own exploration route.
Sources & version notes
Use these references alongside the guide to check changing rules, availability, and update details. Community-maintained references are identified below. Strategy examples above are Snowyme's editorial guidance.
- Bandai Namco: Elden Ring starter guide ↗
Official controls and system explanations, including stamina, equipment, and combat basics.
- Elden Ring official site ↗
Official base-game information and links to update announcements.
An independent guide by Snowyme. Not affiliated with or endorsed by the game's publisher. Cover artwork is an original strategy illustration, not an in-game screenshot.